The engine oil change is a routine maintenance step every time the service warning light comes on . It also involves replacing the oil filter, and the cost can sometimes be quite high—yet it is entirely possible to do it yourself! Follow this guide !
Regardless of the type of internal combustion engine in your vehicle, it is crucial to regularly change the engine oil. In this article, you'll discover eight essential steps to properly perform an engine oil change yourself.


Are you looking for a car scanner ?

- My model is not in the list
 I don't have any lights on
Why change your car’s engine oil ?
Engine oil degrades over time, so it needs to be replaced regularly to prevent engine damage. This process often includes changing the oil filter as well.
Luckily, you can perform your own oil change puisqu’as it’s one of the simplest mechanical operations, saving you from having to spend a significant amount of money.
When should you change your oil ?
Most vehicles now have a dashboard indicator showing the remaining mileage before the next oil change. Typically, oil should be changed every 5,000 to 15,000 miles, or every 1 to 2 years.
This also depends on your driving habits and, of course, the quality of the engine oil.
Which engine oil should you use ?
How do you choose the right oil for your engine ?
You’ll need to add new oil once the old one has been fully drained. Refer to the manufacturer’s recommendations and your driving habits :
- City Driving : Opt for semi-synthetic oil, which is better suited for short trips with frequent stops and starts that put more strain on the engine.
- Sporty Driving : A fully synthetic oil is recommended for optimal lubrication and high-performance reliability.
- Highway or Mixed Driving : Choose mineral oil, which is well-suited for long journeys and highway driving with fewer gear shifts and mechanical stress.
You should also pay attention to the viscosity index, which represents how thick or fluid the oil is.
The lighter the oil, the better it will flow through the engine, improving lubrication.
It is represented on oil containers by the numbers written before and after the 'W'.
For example, let’s look at a 5W30 oil :

► 5W : The first number represents the viscosity in cold temperatures (W = Winter).
The higher this rating, the less fluid the oil is.
. If you live in a colder region, you should choose a rating close to 0. For those living in warmer areas, you can safely opt for a higher rating.
► 30 : The second number indicates the oil’s viscosity at high temperature. The higher the number, the better the quality and performance in terms of lubrication.
Therefore, if you live in a warm area, it's best to choose a higher rating, to effectively cool and lubricate your engine. In colder regions, on the other hand, you can opt for a lower rating, such as 30, for example.
For colder regions, 5W30 or 0W30 is a good choice, whereas in hotter climates, 10W40 or 10W60 is preferable.
Note that for modern vehicles, 5W30 oil is often recommended as it is less viscous and can help reduce fuel consumption, depending on the engine.
However, always check the manufacturer's recommendations, as some engines require a specific type of oil—especially Diesel engines, which may need additional additives.
Which oil filter should you use ?
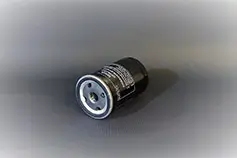
The oil filter is a crucial component that should be replaced with every oil change to maintain the effectiveness of the new oil.
You can also refer to the manufacturer's recommendations, or consult a technician at an auto center or garage, who will be able to find a compatible reference for you.
Are you looking for a car scanner ?
How to change your engine oil in 8 steps !
Step 1: Required equipment
Before starting, make sure you have everything you need !
- At least two jack stands (four recommended for better stability). to lift the vehicle. You can also use a curb or concrete blocks, but it's safer to invest around twenty euros in good jack stands, especially if you plan to perform this operation regularly. Additionally, consider placing wheel chocks to prevent any accidental movement.
- An oil filter wrench (strap, square, or claw type, depending on your filter).
- A drain pan or container to collect used oil.
- A funnel.
- A socket or wrench to loosen the drain plug.
- A new oil filter (check your manual for the right size).
- A new oil filter.
- A 5-litre container of new engine oil.
Finally, have a standard screwdriver to remove the engine undertray, old newspapers or a tarp to protect the area under the car, and cloths for cleaning up after the oil change.
Step 2: Warm up the engine
This step is optional but will make the task much easier. Letting the engine run for 5 to 10 minutes (depending on the vehicle) will help the oil warm up, allowing it to drain more easily.
Caution: Be mindful of burn risks. EEnsure the temperature does not exceed 80-85°C (176-185°F), which is already more than sufficient for an oil change.
Step 3: Position Your Car Properly
Once the engine is warm, prepare your workspace by laying down newspapers or a tarp to protect the ground. Slightly lift your vehicle with a jack to safely position the jack stands.
Take your time to secure the locking position of the jack stands properly. It’s crucial that the vehicle remains as level and stable as possible—you’ll be working underneath it, so safety is key.
Note: Some vehicles, like 4x4s and SUVs, are already high enough and may not require jack stands.
A curb or a sloped surface can also help provide additional clearance, but assess the situation carefully.
Once you're ready, remove the oil filler cap under the hood.
Step 4: Begin draining the oil !
It's time to get under the vehicle!
Use a screwdriver to remove the protective cover, giving you access to the oil pan, a metal reservoir screwed beneath the engine. Now, locate the drain plug—it is usually positioned directly under the oil pan, though in some cases, it may be on the side. Before unscrewing it, place your drain pan directly underneath to collect the used oil that will start flowing as soon as you remove the plug.

Tips : Wearing latex gloves can help prevent burns if the oil is still hot.
Use an appropriate wrench (socket or box wrench) and slowly loosen the plug, keeping hold of it to prevent it from falling into the drain pan. Once loosened, the oil will start draining—the oil change process has begun... and it might take a while.
Step 5 : Replace the oil filter
While waiting, you can start unscrewing the oil filter.
Caution : Once removed, oil will most likely leak from the filter. Prepare a second drain pan, transfer the contents into the main drain pan used for the oil pan drainage, or wait until the oil has completely drained before proceeding.
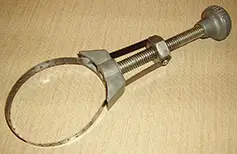
To remove the filter, (strap, claw, or square type) and loosen it slowly. If it's stuck, you can use a screwdriver as leverage to help loosen it.
Next, take your new filter and apply a small amount of fresh oil to the rubber gasket (or sealing ring) to ensure proper lubrication and a good seal. This will also make it easier to install and remove during the next oil change.
If needed, follow the instructions on the box for proper installation. Screw it in carefully by hand first, then finish tightening it with the strap wrench, turning it only half a turn or even just a quarter turn.
Step 6 : Verify the drainage
Once the oil change is complete, it is recommended to pour about a glass of fresh oil to help flush out any remaining residues of the used oil in the system. Leave the oil pan open and wait until the oil has completely drained again. This step is not mandatory but can help extend the lifespan of your new oil by preventing any mixing with the old one.
Step 7 : Reinstall the oil pan drain plug
Once the oil has completely drained, get back under the car to reinstall the oil pan drain plug. Make sure to use a new washer to prevent leaks. Start screwing it in gently by hand, then tighten it with an appropriate wrench, being careful not to overtighten, as oil pans and bolts are generally quite fragile.
Ensure the washer is positioned correctly, the small lip must be facing the engine oil pan to prevent leaks ! Next, reinstall the engine protection cover using a screwdriver, then remove the jack stands to set the car back on a level surface.
Step 8 : Refill with new engine oil
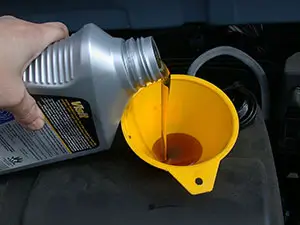
For this step, we recommend using a funnel to avoid spilling oil. Pour about three-quarters of the container (around 4 liters) slowly, allowing time to monitor the dipstick level, as oil takes time to reach the oil pan due to its viscosity.
You can start the engine at this stage to help warm the oil and allow it to circulate more efficiently.
Then, adjust the level according to the dipstick. Typically, the gap between the minimum and maximum marks represents about 1 liter of oil.
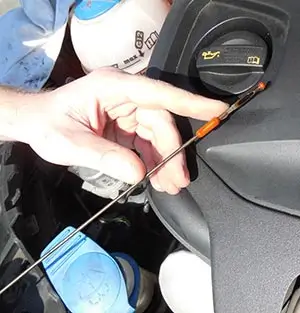
Never exceed the maximum level as this could damage seals or even the catalytic converter ! Ensure you get as close as possible to the maximum limit, adding a little more oil at the end if needed.
Once done, don't forget to securely replace the oil cap :)
Start the engine and let it run for a few minutes to allow the maintenance light to turn off and the oil circuit to fully fill, especially around the oil filter. Since the filter tends to lower the oil level as it fills, double-check the dipstick once more, and top up if necessary.
Are you looking for a car scanner ?
After the oil change
Dispose of used oil responsibly !
I can already see some thinking, "That’s it, we’re done!" … but not yet !
Disposing of used oil improperly is absolutely unacceptable. Pouring it into nature or down a drain is highly polluting and must be avoided at all costs.
Carefully transfer the used oil back into its original container or into bottles, then go to a recycling center, a garage, or an auto service center, where large containers are available for your used oil to be properly recycled.
Reset the oil change indicator

Finally, to reset the mileage counter before the next oil change, you need to follow a specific procedure using the dashboard controls, which varies depending on the vehicle. Refer to the owner’s manual or do a quick search online to find the correct method for your car.
Regularly check your oil level
You’ll likely have about 0.5 to 1 litre of oil left after your oil change. Use it for top-ups when necessary. It is therefore recommended to top up the oil from time to time by checking the level regularly.
CThis can help you save money by extending the interval between oil changes. There is no risk since you are using the same oil as initially added, so you might as well take advantage of it !
You can also take this opportunity to check the coolant level. If there is a leak, you will need to flush the cooling system as well.
Changing your own oil ?
Doing your own oil change will have only cost you a bit of time, about 1.5 hours if you're a beginner, or around 30 minutes if you're experienced.
We also recommend taking this opportunity to check the overall condition of your engine and vehicle, especially the filters (air filter, fuel filter, etc.), to ensure proper filtration of air, oil, and fuel. Poor maintenance can lead to performance drops and increased fuel consumption.
Other fluids should also be checked regularly, such as brake fluid, coolant, and AdBlue if you have a diesel engine.
With a Car Diagnostics Scanner, you can check for any fault codes, whether confirmed or pending, and inspect the condition of some components while your vehicle is still on the jack stands.
Learn more
That’s it for this article on engine oil changes. If you have any tips or questions, feel free to share them in the comments.
You can also share this article with your friends on social media!